· One min read

Question

When trying to connect from PowerBI to ClickHouse using the connector, you receive the following authentication error:

We encountered an error while trying to connect.
Details: "ODBC: ERROR [HY000] HTTP status code: 403
Received error:
Code: 516. DB::Exception: default: Authentication failed: password is incorrect, or there is no user with such name.
If you have installed ClickHouse and forgot password you can reset it in the configuration file.
The password for default user is typically located at /etc/clickhouse-server/users.d/default-password.xml and deleting this file will reset the password.
See also /etc/clickhouse-server/users.ml on the server where
ClickHouse is installed.
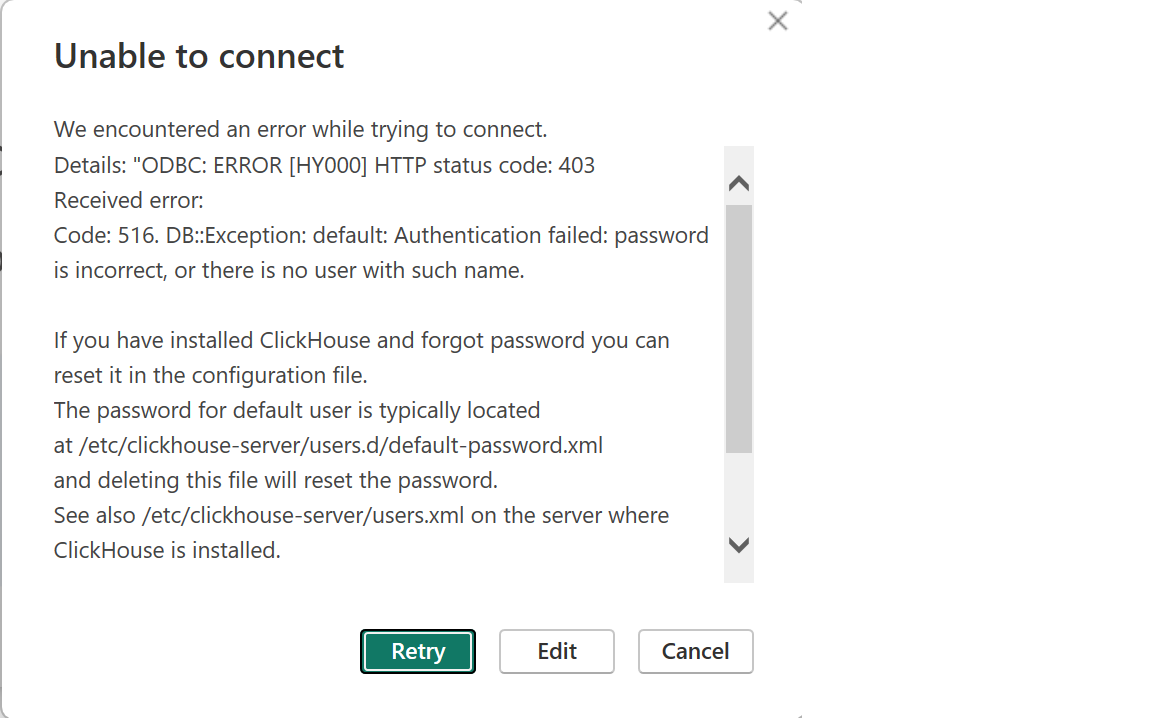
powerbi_error

Answer

Check the password being used to see if the password contains a tilde ~.

The recommendation is to use a dedicated user for the connection and set the password manually. If using ClickHouse Cloud and the admin level of permissions with the default user is needed, then create a new user and and assign the default_role.

For more information:
https://clickhouse.com/docs/en/operations/access-rights#user-account-management
https://clickhouse.com/docs/en/cloud/security/cloud-access-management#database-roles
· 2 min read

Question

How do I create a table that can query other clusters or instances?

Answer

Below is a simple example to test functionality.

In this example, ClickHouse Cloud is use but the example will work when using self-hosted clusters also. The targets will need to change to the urls/hosts/dns of a target node or load balancer.

In cluster A:

./clickhouse client --host clusterA.us-west-2.aws.clickhouse.cloud --secure --password 'Password123!'

Create the database:

create database db1;

Create the table:

 CREATE TABLE db1.table1_remote1
(
`id` UInt32,
`timestamp_column` DateTime,
`string_column` String
)
ENGINE = MergeTree()
ORDER BY id;

Insert some sample rows:

insert into db1.table1_remote1
values
(1, '2023-09-29 00:01:00', 'a'),
(2, '2023-09-29 00:02:00', 'b'),
(3, '2023-09-29 00:03:00', 'c');

In cluster B:

./clickhouse client --host clusterB.us-east-2.aws.clickhouse.cloud --secure --password 'Password123!'

Create the database:

create database db1;

Create the table:

CREATE TABLE db1.table1_remote2
(
`id` UInt32,
`timestamp_column` DateTime,
`string_column` String
)
ENGINE = MergeTree()
ORDER BY id;

Insert sample rows:

insert into db1.table1_remote1
values
(4, '2023-09-29 00:04:00', 'x'),
(5, '2023-09-29 00:05:00', 'y'),
(6, '2023-09-29 00:06:00', 'z');

In Cluster C:
*this cluster will be used to gather the data from the other two clusters, however, can also be used as a source.

./clickhouse client --host clusterC.us-west-2.aws.clickhouse.cloud --secure --password 'Password123!'

Create the database:

create database db1;

Create the remote tables with remoteSecure() to connect to the other clusters.
Definition for remote cluster A table:

CREATE TABLE db1.table1_remote1_main
(
`id` UInt32,
`timestamp_column` DateTime,
`string_column` String
) AS remoteSecure('clusterA.us-west-2.aws.clickhouse.cloud:9440', 'db1.table1_remote1', 'default', 'Password123!');

Definition for remote cluster B table:

CREATE TABLE db1.table1_remote2_main
(
`id` UInt32,
`timestamp_column` DateTime,
`string_column` String
) AS remoteSecure('clusterB.us-east-2.aws.clickhouse.cloud:9440', 'db1.table1_remote2', 'default', 'Password123!')

Create the merge table to be used to gather results:

create table db1.table1_merge_remote
(
id UInt32,
timestamp_column DateTime,
string_column String
)
engine = Merge('db1', 'table.\_main');

Test the results:

clickhouse-cloud :) select * from db1.table1_merge_remote;

SELECT *
FROM db1.table1_merge_remote

Query id: 46b6e741-bbd1-47ed-b40e-69ddb6e0c364

┌─id─┬────timestamp_column─┬─string_column─┐
│ 1 │ 2023-09-29 00:01:00 │ a │
│ 2 │ 2023-09-29 00:02:00 │ b │
│ 3 │ 2023-09-29 00:03:00 │ c │
└────┴─────────────────────┴───────────────┘
┌─id─┬────timestamp_column─┬─string_column─┐
│ 4 │ 2023-09-29 00:04:00 │ x │
│ 5 │ 2023-09-29 00:05:00 │ y │
│ 6 │ 2023-09-29 00:06:00 │ z │
└────┴─────────────────────┴───────────────┘

6 rows in set. Elapsed: 0.275 sec.

For more info:
https://clickhouse.com/docs/en/sql-reference/table-functions/remote
https://clickhouse.com/docs/en/engines/table-engines/special/merge

· 4 min read

Question

What data types should I use in ClickHouse to optimize my queries for speed and storage?

Answer

Many times when using an automated conversion from another system or trying to choose a data type, users will often choose the "more is better" or "choose what's easier" or "choose the most generic" approaches. This will likely work for small datasets in the millions, maybe even billions of rows. It may not be noticeable and is acceptable for those type of sets where users' queries difference is small in their use-cases.

It will not be acceptable, however, as the data grows and becomes more noticeable.

The difference between a query taking 50ms and 500ms may be okay for most use-cases, for example in a webUI, but one is 10x slower than the other, even though for a front-end user, is not very noticeable.

Example initial table:

timestamp Datetime64(9),
group_id Int64,
vendor_id String,
product_id String,
category1 Int64,
code_name String,
paid_status String,
country_code String,
description String,
price Float64,
attributes Map(String, String)

Sample data:

3456, 0123456789, bd6087b7-6026-4974-9122-bc99faae5d84, "2024-03-01 01:00:01.000", 98, "bear", paid", "us", "corvette model car", 123.45, {"color" : "blue", "size" : "S"}
156, 0000012345, bd6087b7-6026-4974-9122-bc99faae5d84, "2024-03-01 01:00:02:123", 45, "tiger", "not paid", "uk", "electric car", 53432.10, {"color" : "red", "model" : "X"}
...

Below are some recommendations where this data could be optimized:

timestamp : DateTime64(9)
Unless needing scientific precision, a value of 9 precision (nanoseconds), is unlikely necessary. Possibly could be for display or ordering, but usually not in queries for searching, primary keys, etc.

  • Recommendation:
    For PK, order by: DateTime
    For display or ordering: add additional column - i.e. timestamp_microseconds : DateTime64(6)

group_id : Int64
This appears to be an integer, select the smallest integer type that will fit the max number for the column required. From this sample dataset and name of the column, it is unlikely to need a quintillion values, probably an Int16 would work where it could have up to 16k values.

  • Recommendation: Int16

vendor_id : String
This column looks like to be a number but has leading zeros, likely important to keep formatting. Also appears to be only a certain number of chars.

  • Recommendation: FixedString(10)

product_id : String
This one is alphanumeric so intuitively would be a string, however, it is also a UUID.

  • Recommendation: UUID

category1 : Int64
The values are small, probably not very many categories and not looking to grow very much or limited. Less than 255

  • Recommendation: UInt8

code_name : String
This field looks like it may have only a limited number of strings that would be used. For this kind of situation where the number of string values might be in the hundreds or thousands, low cardinality fields help.

  • Recommendation: LowCardinality(String)

paid_status : String
There is a string value of "paid" or "not_paid". For situations where there may be only two values, use a boolean.

  • Recommendation: Bool

country_code : String
Sometimes there are columns which meet multiple optimizations. In this example, there are only a certain number of country codes and they are all two character identifiers.

  • Recommendation: LowCardinality(FixedString(2))

price : Float64
Floats are not recommended when there is a fixed precision that is known, especially for financial data and calculations. Best is to use Decimal types for the precision necessary. For this use-case, it is likely that the price of the item is not over 999,999.00

  • Recommendation: Decimal(10,2)

attributes : map
Often there might be a table with dynamic attributes in maps. Searching for keys or values is usually slower. There’s a couple of ways that the maps can be made faster. If there are keys that will be present in most records, best to place those in a separate column as low cardinality and those that will be sparse in another column high cardinality. From there, it will be more efficient to create skip indexes although it may increase the complexity of the queries.

  • Recommendation: lc_attributes: Map(String, String), hc_attributes: Map(String, String).

Depending on the queries, the options that can also be used to create a skip index and/or extract the attributes are:
Using Array Join to extract into columns using a Materialized View: https://clickhouse.com/docs/knowledgebase/using-array-join-to-extract-and-query-attributes
Using a skip index for the keys: https://clickhouse.com/docs/knowledgebase/improve-map-performance

· 4 min read

Question

If I have varying attributes in a column using map types, how can I extract them and use them in queries?

Answer

This is a basic example of extracting keys and values from a variable attributes field. This method will create seemingly duplicates from each row in the source/raw table. Due to the keys and values being extracted, however, they can be put into the Primary Key or a secondary with an index, such as a bloom filter.

In this example, we basically have a source that creates a metrics table, it has multiple attributes that can apply in an attributes field that has maps. If there are attributes that will always be present for records, it is better to pull those out into their own columns and populate.

You should be able to just copy and paste to see what the outputs would be and what the materialized view does in this instance.

Create a sample database:

create database db1;

Create the initial table that will have the rows and attributes:

create table db1.table1_metric_map
(
id UInt32,
timestamp DateTime,
metric_name String,
metric_value Int32,
attributes Map(String, String)
)
engine = MergeTree()
order by timestamp;

Insert sample rows into the table. The sample size is intentionally small so that when the materialized view is created, you can see how the rows are multiplied for each attribute.

insert into db1.table1_metric_map
VALUES
(1, '2023-09-20 00:01:00', 'ABC', 10, {'env':'prod','app':'app1','server':'server1'}),
(2, '2023-09-20 00:01:00', 'ABC', 20,{'env':'prod','app':'app2','server':'server1','dc':'dc1'}),
(3, '2023-09-20 00:01:00', 'ABC', 30,{'env':'qa','app':'app1','server':'server1'}),
(4, '2023-09-20 00:01:00', 'ABC', 40,{'env':'qa','app':'app2','server':'server1','dc':'dc1'}),
(5, '2023-09-20 00:01:00', 'DEF', 50,{'env':'prod','app':'app1','server':'server2'}),
(6, '2023-09-20 00:01:00', 'DEF', 60, {'env':'prod','app':'app2','server':'server1'}),
(7, '2023-09-20 00:01:00', 'DEF', 70,{'env':'qa','app':'app1','server':'server1'}),
(8, '2023-09-20 00:01:00', 'DEF', 80,{'env':'qa','app':'app2','server':'server1'}),
(9, '2023-09-20 00:02:00', 'ABC', 90,{'env':'prod','app':'app1','server':'server1'}),
(10, '2023-09-20 00:02:00', 'ABC', 100,{'env':'prod','app':'app1','server':'server2'}),
(11, '2023-09-20 00:02:00', 'ABC', 110,{'env':'qa','app':'app1','server':'server1'}),
(12, '2023-09-20 00:02:00', 'ABC', 120,{'env':'qa','app':'app1','server':'server1'}),
(13, '2023-09-20 00:02:00', 'DEF', 130,{'env':'prod','app':'app1','server':'server1'}),
(14, '2023-09-20 00:02:00', 'DEF', 140,{'env':'prod','app':'app2','server':'server1','dc':'dc1'}),
(15, '2023-09-20 00:02:00', 'DEF', 150,{'env':'qa','app':'app1','server':'server2'}),
(16, '2023-09-20 00:02:00', 'DEF', 160,{'env':'qa','app':'app1','server':'server1','dc':'dc1'}),
(17, '2023-09-20 00:03:00', 'ABC', 170,{'env':'prod','app':'app1','server':'server1'}),
(18, '2023-09-20 00:03:00', 'ABC', 180,{'env':'prod','app':'app1','server':'server1'}),
(19, '2023-09-20 00:03:00', 'ABC', 190,{'env':'qa','app':'app1','server':'server1'}),
(20, '2023-09-20 00:03:00', 'ABC', 200,{'env':'qa','app':'app1','server':'server2'}),
(21, '2023-09-20 00:03:00', 'DEF', 210,{'env':'prod','app':'app1','server':'server1'}),
(22, '2023-09-20 00:03:00', 'DEF', 220,{'env':'prod','app':'app1','server':'server1'}),
(23, '2023-09-20 00:03:00', 'DEF', 230,{'env':'qa','app':'app1','server':'server1'}),
(24, '2023-09-20 00:03:00', 'DEF', 240,{'env':'qa','app':'app1','server':'server1'});

We can then create a materialized view with array join so that it can extract the map attributes onto keys and values columns. For demonstration, in the example below, it uses an implicit table (with the POPULATE command, and backing table like .inner.{uuid}... ). The recommended best practice, however, is to use an explicit table where you wouldd define the table first, then create a materialized view on top with the TO command instead.

CREATE MATERIALIZED VIEW db1.table1_metric_map_mv
ORDER BY id
POPULATE AS
select
*,
attributes.keys as attribute_keys,
attributes.values as attribute_values
from db1.table1_metric_map
array join attributes
where notEmpty(attributes.keys);

The new table will have more rows and will have the keys extracted, like this:

SELECT *
FROM db1.table1_metric_map_mv
LIMIT 5

Query id: b7384381-53af-4e3e-bc54-871f61c033a6

┌─id─┬───────────timestamp─┬─metric_name─┬─metric_value─┬─attributes───────────┬─attribute_keys─┬─attribute_values─┐
│ 1 │ 2023-09-20 00:01:00 │ ABC │ 10 │ ('env','prod') │ env │ prod │
│ 1 │ 2023-09-20 00:01:00 │ ABC │ 10 │ ('app','app1') │ app │ app1 │
│ 1 │ 2023-09-20 00:01:00 │ ABC │ 10 │ ('server','server1') │ server │ server1 │
│ 2 │ 2023-09-20 00:01:00 │ ABC │ 20 │ ('env','prod') │ env │ prod │
│ 2 │ 2023-09-20 00:01:00 │ ABC │ 20 │ ('app','app2') │ app │ app2 │
└────┴─────────────────────┴─────────────┴──────────────┴──────────────────────┴────────────────┴──────────────────┘

From here, in order to query for your rows that need certain attributes, you would do something like this:

SELECT
t1_app.id AS id,
timestamp,
metric_name,
metric_value
FROM
(
SELECT *
FROM db1.table1_metric_map_mv
WHERE (attribute_keys = 'app') AND (attribute_values = 'app1') AND (metric_name = 'ABC')
) AS t1_app
INNER JOIN
(
SELECT *
FROM db1.table1_metric_map_mv
WHERE (attribute_keys = 'server') AND (attribute_values = 'server1')
) AS t2_server ON t1_app.id = t2_server.id

Query id: 72ce7f19-b02a-4b6e-81e7-a955f257436d

┌─id─┬───────────timestamp─┬─metric_name─┬─metric_value─┐
│ 1 │ 2023-09-20 00:01:00 │ ABC │ 10 │
│ 3 │ 2023-09-20 00:01:00 │ ABC │ 30 │
│ 9 │ 2023-09-20 00:02:00 │ ABC │ 90 │
│ 11 │ 2023-09-20 00:02:00 │ ABC │ 110 │
│ 12 │ 2023-09-20 00:02:00 │ ABC │ 120 │
│ 17 │ 2023-09-20 00:03:00 │ ABC │ 170 │
│ 18 │ 2023-09-20 00:03:00 │ ABC │ 180 │
│ 19 │ 2023-09-20 00:03:00 │ ABC │ 190 │
└────┴─────────────────────┴─────────────┴──────────────┘

· 3 min read

Question

How do I set up ClickHouse with a Docker image to connect to Microsoft SQL Server?

Answer

Notes on this example

  • Uses the ClickHouse Docker Ubuntu image
  • Uses the FreeTDS Driver
  • Uses MSSQL Server 2012R2
  • Windows hostname for this example is MARSDB2.marsnet2.local at IP: 192.168.1.133 (update with your hostname and/or IP)
  • MSSQL Instance name MARSDB2
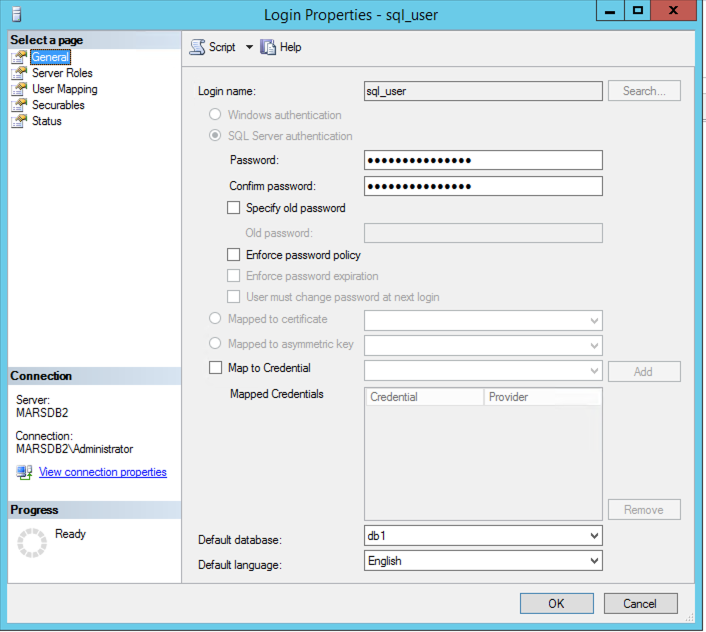
  • MSSQL Login and datbase users are sql_user

Example setup in MSSQL for testing

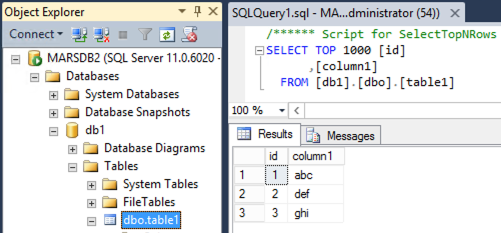
Database and table created in MSSQL:

Screenshot 2024-01-01 at 8 25 50 PM

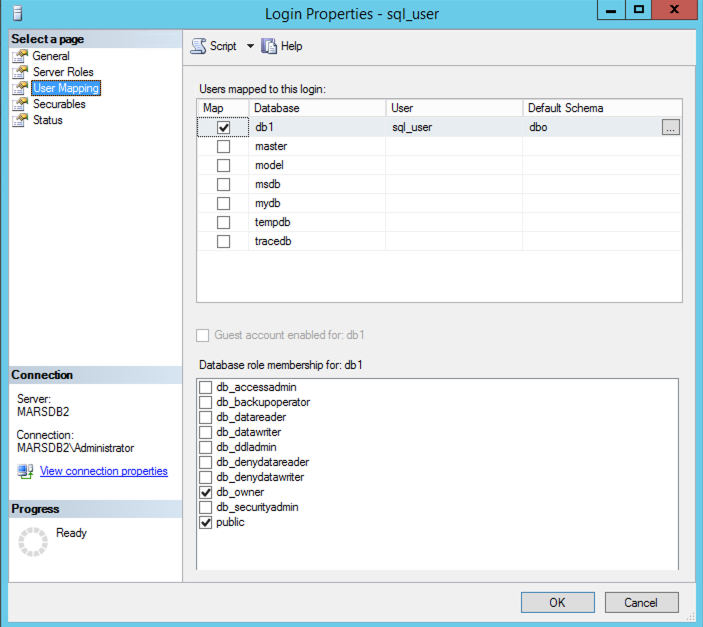
MSSQL Login User, sql_user:

Screenshot 2024-01-01 at 8 27 11 PM

Database membership roles for sql_user:

Screenshot 2024-01-01 at 8 27 35 PM

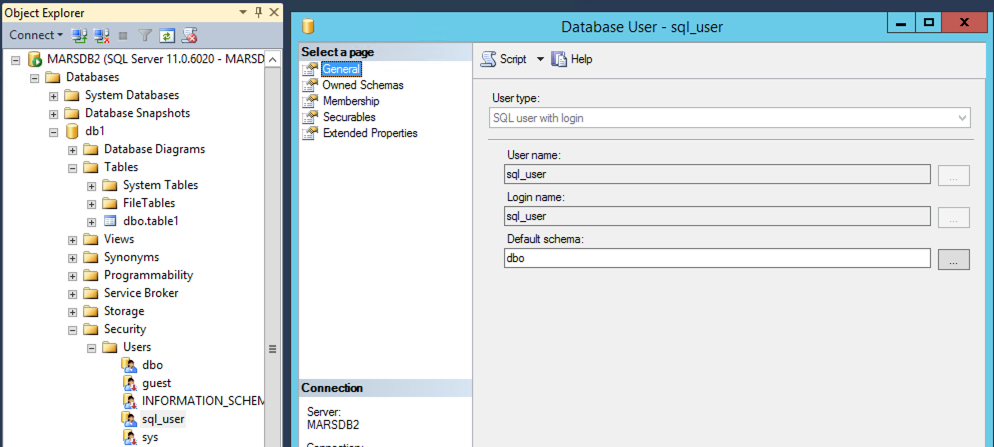
Database User with Login:

Screenshot 2024-01-01 at 8 35 34 PM

Configuring ClickHouse with ODBC

Create a working directory:

mkdir ch-odbc-mssql
cd ch-odbc-mssql

Create an odbc.ini file:

vim odbc.ini

Add the following entries to update the name of the DSN and IP:

[marsdb2_mssql]
Driver = FreeTDS
Server = 192.168.1.133

Create an odbcinst.ini file:

vim odbcinst.ini

Add the following entries (trace is optional but helps with debugging):

[ODBC]
Trace = Yes
TraceFile = /tmp/odbc.log

[FreeTDS]
Description = FreeTDS
Driver = /usr/lib/aarch64-linux-gnu/odbc/libtdsodbc.so
Setup = /usr/lib/x86_64-linux-gnu/odbc/libtdsS.so
UsageCount = 1

Configure a Dockerfile to download the image and add the TDS and required ODBC libraries

Create the Dockerfile:

vim Dockerfile

Add the contents of the Dockerfile:

FROM clickhouse/clickhouse-server:23.10

# Install the ODBC driver

RUN apt-get update && apt-get install -y --no-install-recommends unixodbc \
&& apt-get install -y freetds-bin freetds-common freetds-dev libct4 libsybdb5 \
&& apt-get install tdsodbc

Build the new docker image:

docker build . -t marsnet/clickhouse-odbc:23.10

Create a docker-compose.yml file:

vim docker-compose.yml

Add the following contents to the YAML:

version: '3.7'
services:
clickhouse:
image: marsnet/clickhouse-odbc:23.10
container_name: clickhouse-odbc
hostname: clickhouse-host
ports:
- "9000:9000"
- "8123:8123"
- "9009:9009"
volumes:
- ./odbc.ini:/etc/odbc.ini
- ./odbcinst.ini:/etc/odbcinst.ini
restart: always
ulimits:
memlock:
soft: -1
hard: -1
nofile:
soft: 262144
hard: 262144
deploy:
resources:
limits:
memory: 4g

Start the container:

docker compose up --detach

After you start the container, you should see something like this:

ch-odbc-mssql % docker compose up --detach
[+] Running 1/1
✔ Container clickhouse-odbc Started

Check to ensure the container is running:

ch-odbc-mssql % docker ps
CONTAINER ID IMAGE COMMAND CREATED STATUS PORTS NAMES
87a400b803ce marsnet/clickhouse-odbc:23.10 "/entrypoint.sh" 57 minutes ago Up About a minute 0.0.0.0:8123->8123/tcp, 0.0.0.0:9000->9000/tcp, 0.0.0.0:9009->9009/tcp clickhouse-odbc

Test ODBC connection

Login with the ClickHouse client:

./clickhouse client

Test the SELECT using the odbc table function to the remote MSSQL Database table:

clickhouse-host :) SELECT * from odbc('DSN=marsdb2_mssql;port=1433;Uid=sql_user;Pwd=ClickHouse123;Database=db1', 'table1');

SELECT *
FROM odbc('DSN=marsdb2_mssql;port=1433;Uid=sql_user;Pwd=ClickHouse123;Database=db1', 'table1')

Query id: 23494da2-6e12-4ade-95fa-372a0420cac1

┌─id─┬─column1─┐
│ 1 │ abc │
│ 2 │ def │
│ 3 │ ghi │
└────┴─────────┘

3 rows in set. Elapsed: 0.188 sec.

You can also create a remote table using the odbc table engine:

CREATE TABLE table1_odbc_mssql
(
`id` Int32,
`column1` String
)
ENGINE = ODBC('DSN=marsdb2_mssql;port=1433;Uid=sql_user;Pwd=ClickHouse123;Database=db1', 'dbo', 'table1')

Use a SELECT query to test the new remote table:

clickhouse-host :) select * from table1_odbc_mssql;

SELECT *
FROM table1_odbc_mssql

Query id: 94724368-485d-4364-ae58-a435a225c37d

┌─id─┬─column1─┐
│ 1 │ abc │
│ 2 │ def │
│ 3 │ ghi │
└────┴─────────┘

3 rows in set. Elapsed: 0.218 sec.

For more information, please see:

· 2 min read

Question

How do I work with JSON message using a source or landing table to extract with a Materialized View?
How do I work with JSON without the experimental JSON Object?

Answer

A common pattern to work with JSON data is to send the data to a landing table and use JSONExtract functions to pull the data onto a new table using a Materialized View trigger. This is normally done in the following flow and pattern:

source data --> MergeTree table --> Materialized View (with base table) --> application/client

The landing table should have a raw string field where you would store the raw json. It should also have one to two other fields that can be used for management of that table so that it could be partitioned and trimmed as the data ages.

*some integrations can add fields to the original data for example if using the ClickHouse Kafka Connector Sink.

Simplified example below:

  • create the example database
create database db1;
  • create a landing table where your raw json will be inserted:
create table db1.table2_json_raw
(
id Int32,
timestamp DateTime,
raw String
)
engine = MergeTree()
order by timestamp;
  • create the base table for the materialized view
create table db1.table2_json_mv_base
(
id Int32,
timestamp DateTime,
raw_string String,
custId Int8,
custName String
)
engine = MergeTree()
order by timestamp;
  • create the materialized view to the base table
create materialized view db1.table2_json_mv to db1.table2_json_mv_base
AS SELECT
id,
timestamp,
raw as raw_string,
simpleJSONExtractRaw(raw, 'customerId') as custId,
simpleJSONExtractRaw(raw, 'customerName') as custName
FROM
db1.table2_json_raw;
  • insert some sample rows
 insert into db1.table2_json_raw
values
(1, '2024-05-16 00:00:00', '{"customerId":1, "customerName":"ABC"}'),
(2, '2024-05-16 00:00:01', '{"customerId":2, "customerName":"XYZ"}');
  • view the results from the extraction and the materialized view that would be used in the queries
clickhouse-cloud :) select * from db1.table2_json_mv;

SELECT *
FROM db1.table2_json_mv

Query id: 12655fd3-567a-4dfb-9ef7-abc4b11ad044

┌─id─┬───────────timestamp─┬─raw_string─────────────────────────────┬─custId─┬─custName─┐
│ 1 │ 2024-05-16 00:00:00 │ {"customerId":1, "customerName":"ABC"} │ 1 │ "ABC" │
│ 2 │ 2024-05-16 00:00:01 │ {"customerId":2, "customerName":"XYZ"} │ 2 │ "XYZ" │
└────┴─────────────────────┴────────────────────────────────────────┴────────┴──────────┘

Additional Reference links:
Materialized Views: https://clickhouse.com/docs/en/guides/developer/cascading-materialized-views
Working with JSON: https://clickhouse.com/docs/en/integrations/data-formats/json#other-approaches
JSON functions: https://clickhouse.com/docs/en/sql-reference/functions/json-functions

· 6 min read

This example shows how AD users that belong to different AD security groups can be given role access in ClickHouse. It also shows how a user may be added to multiple AD user groups so they can have access provided by multiple roles.

In this environment, we have the following:

  • A Windows Active Directory domain: marsnet2.local
  • A ClickHouse Cluster, cluster_1S_3R with 3 nodes on a cluster configuration of 1 shard, 3 replicas
  • 3 AD users
AD UserDescription
clickhouse_ad_adminClickHouse Admin user
clickhouse_db1_userUser with access to db1.table1
clickhouse_db2_userUser with access to db2.table1
ch_db1_db2_userUser with access to both db1.table1 and db2.table1
  • 3 AD security groups
AD GroupDescription
clickhouse_ad_adminsClickHouse Admins group
clickhouse_ad_db1_usersGroup to map with access to db1.table1
clickhouse_ad_db2_usersGroup to map with access to db2.table1
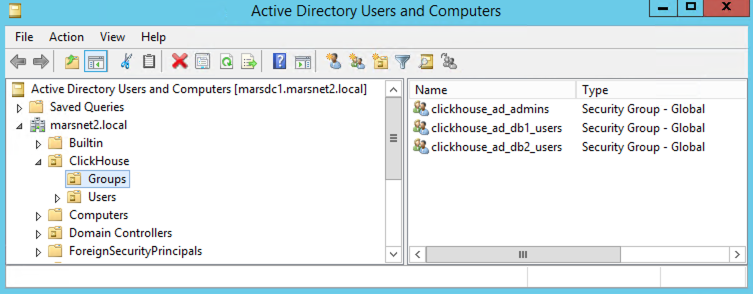
  • Example AD Environment and UO structure:

Example_AD_Env_and_UO_structure

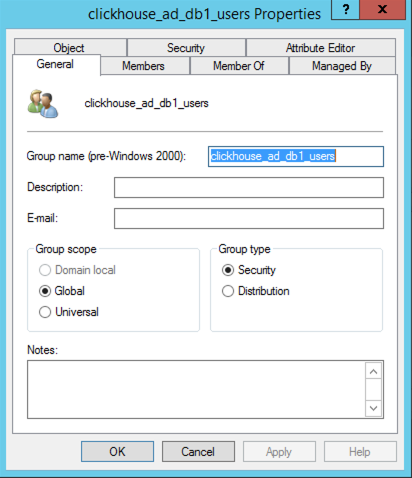
  • Example AD Security Group Configuration:

Example_AD_Group_clickhouse_ad_db1_users

  • Example AD User Configuration:

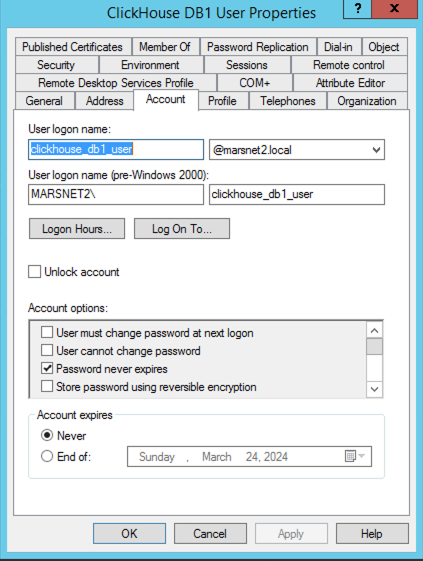
Example_AD_user_clickhouse_db1_user

  1. In Windows AD Users and Groups, add each user to their respective group(s), they will be mapped to the ClickHouse roles (example in the next step).
AD Security GroupClickHouse Role
clickhouse_ad_adminclickhouse_ad_admins
clickhouse_db1_userclickhouse_ad_db1_users
clickhouse_db2_userclickhouse_ad_db2_users
ch_db1_db2_userclickhouse_ad_db1_users and clickhouse_ad_db2_users
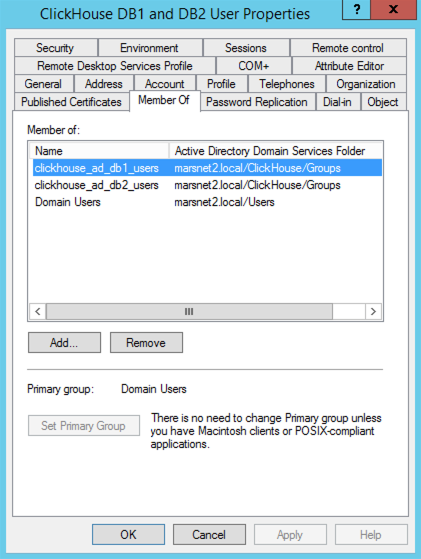
  • Example user group membership:

Example_AD_user_to_group

  1. In ClickHouse config.xml, add the ldap_servers configuration to each ClickHouse node.
<ldap_servers>
<marsnet2_ad>
<host>marsdc1.marsnet2.local</host>
<port>389</port>
<bind_dn>{user_name}@marsnet2.local</bind_dn>
<user_dn_detection>
<base_dn>OU=Users,OU=ClickHouse,DC=marsnet2,DC=local</base_dn>
<search_filter>(&amp;(objectClass=user)(sAMAccountName={user_name}))</search_filter>
</user_dn_detection>
<enable_tls>no</enable_tls>
</marsnet2_ad>
</ldap_servers>
xml tagDescriptionExample Value
ldap_serversTag used to define the ldap servers that will be used by ClickHouseNA
marsnet_adThis tag is arbitrary and is just a label to use to identify the server in <user_directories> sectionNA
hostFQDN or IP Address of Active Directory server or domainmarsdc1.marsnet2.local
portActive Directory Port, usually 389 for non-ssl or 636 for SSL389
bind_dnWhich user will be used to create the bind to AD, it can be a dedicated user if regular users are not allowed to{user_name}@marsnet2.local
user_dn_detectionSettings on how ClickHouse will find the AD usersNA
base_dnAD OU path to start the search for the usersOU=Users,OU=ClickHouse,DC=marsnet2,DC=local
search_filterldap search filter to find the AD user(&(objectClass=user)(sAMAccountName={user_name}))

Refer to documentation for full set of options: https://clickhouse.com/docs/en/operations/external-authenticators/ldap#ldap-server-definition

  1. In ClickHouse config.xml, add the <user_directories> configuration with <ldap> entries to each ClickHouse node.
<user_directories>
<users_xml>
<path>users.xml</path>
</users_xml>
<local_directory>
<path>/var/lib/clickhouse/access/</path>
</local_directory>
<ldap>
<server>marsnet2_ad</server>
<role_mapping>
<base_dn>OU=Groups,OU=ClickHouse,DC=marsnet2,DC=local</base_dn>
<search_filter>(&amp;(objectClass=group)(member={user_dn}))</search_filter>
<attribute>CN</attribute>
<scope>subtree</scope>
<prefix>clickhouse_</prefix>
</role_mapping>
</ldap>
</user_directories>
xml tagDescriptionExample Value
user_directoriesDefines which authenticators will be usedNA
ldapThis contains the settings for the ldap servers, in this AD that will be usedNA
serverThis is the tag that was define in the <ldap_servers> sectionmarsnet2_ad
role_mappingdefinition on how the users authenticated will be mapped between AD groups and ClickHouse rolesNA
base_dnAD path that the system will use to start search for AD groupsOU=Groups,OU=ClickHouse,DC=marsnet2,DC=local
search_filterldap search filter to find the AD groups(&(objectClass=group)(member={user_dn}))
attributeWhich AD attribute field should be used to identify the userCN
scopeWhich levels in the base DN the system should search for the groupssubtree
prefixPrefix for the names of the groups in AD, this prefix will be removed to find the roles in ClickHouseclickhouse_

Refer to documentation for full set of options: https://clickhouse.com/docs/en/operations/external-authenticators/ldap#ldap-external-user-directory

note::: Since the AD security groups were prefixed in the example - i.e. clickhouse_ad_db1_users- when the system retrieves them, the prefix will be removed and the system will look for a ClickHouse role called ad_db1_users to map to clickhouse_ad_db1_users. :::

  1. Create example databases.
create database db1 on cluster 'cluster_1S_3R';
create database db2 on cluster 'cluster_1S_3R';
  1. Create example tables.
create table db1.table1 on cluster 'cluster_1S_3R'
(
id Int32,
column1 String
)
engine = MergeTree()
order by id;

create table db2.table1 on cluster 'cluster_1S_3R
(
id Int32,
column1 String
)
engine = MergeTree()
order by id;
  1. Insert sample data.
insert into db1.table1
values
(1, 'a');

insert into db2.table1
values
(2, 'b');
  1. Create ClickHouse Roles.
create role ad_admins on cluster 'cluster_1S_3R';
create role ad_db1_users on cluster 'cluster_1S_3R';
create role ad_db2_users on cluster 'cluster_1S_3R';
  1. Grant the privileges to the roles.
GRANT SHOW, SELECT, INSERT, ALTER, CREATE, DROP, UNDROP TABLE, TRUNCATE, OPTIMIZE, BACKUP, KILL QUERY, KILL TRANSACTION, MOVE PARTITION BETWEEN SHARDS, ACCESS MANAGEMENT, SYSTEM, dictGet, displaySecretsInShowAndSelect, INTROSPECTION, SOURCES, CLUSTER ON *.* on cluster 'cluster_1S_3R' TO ad_admins WITH GRANT OPTION;

GRANT SELECT ON db1.table1 on cluster 'cluster_1S_3R' TO ad_db1_users;

GRANT SELECT ON db2.table1 on cluster 'cluster_1S_3R' TO ad_db2_users;
  1. Test access for restricted db1 user. For example:
root@chnode1:/etc/clickhouse-server# clickhouse-client --user clickhouse_db1_user --password MyPassword123  --secure --port 9440 --host chnode1.marsnet.local
ClickHouse client version 24.1.3.31 (official build).
Connecting to chnode1.marsnet.local:9440 as user clickhouse_db1_user.
Connected to ClickHouse server version 24.1.3.


clickhouse :) select * from db1.table1;

SELECT *
FROM db1.table1

Query id: b04b92d6-5b8b-40a2-a92a-f06f15774930

┌─id─┬─column1─┐
│ 1 │ a │
└────┴─────────┘

1 row in set. Elapsed: 0.004 sec.

clickhouse :) select * from db2.table1;

SELECT *
FROM db2.table1

Query id: 7f7eaa44-7b47-4184-807a-6968a56057ad


Elapsed: 0.115 sec.

Received exception from server (version 24.1.3):
Code: 497. DB::Exception: Received from chnode1.marsnet.local:9440. DB::Exception: clickhouse_db1_user: Not enough privileges. To execute this query, it's necessary to have the grant SELECT(id, column1) ON db2.table1. (ACCESS_DENIED)
  1. Test access for the user that has access to both databases, db1 and db2. For example:
root@chnode1:/etc/clickhouse-server# clickhouse-client --user ch_db1_db2_user --password MyPassword123  --secure --port 9440 --host chnode1.marsnet.local
ClickHouse client version 24.1.3.31 (official build).
Connecting to chnode1.marsnet.local:9440 as user ch_db1_db2_user.
Connected to ClickHouse server version 24.1.3.

clickhouse :) select * from db1.table1;

SELECT *
FROM db1.table1

Query id: 23084744-08c2-48bd-8635-a23438812026

┌─id─┬─column1─┐
│ 1 │ a │
└────┴─────────┘

1 row in set. Elapsed: 0.005 sec.

clickhouse :) select * from db2.table1;

SELECT *
FROM db2.table1

Query id: f9954ec4-d8d9-4b5a-9f68-a7aa79a1bb4a

┌─id─┬─column1─┐
│ 2 │ b │
└────┴─────────┘

1 row in set. Elapsed: 0.004 sec.
  1. Test access for the Admin user. For example:
root@chnode1:/etc/clickhouse-server# clickhouse-client --user clickhouse_ad_admin --password MyPassword123  --secure --port 9440 --host chnode1.marsnet.local
ClickHouse client version 24.1.3.31 (official build).
Connecting to chnode1.marsnet.local:9440 as user clickhouse_ad_admin.
Connected to ClickHouse server version 24.1.3.

clickhouse :) create table db1.table2 on cluster 'cluster_1S_3R'
(
id Int32,
column1 String
)
engine = MergeTree()
order by id;

CREATE TABLE db1.table2 ON CLUSTER cluster_1S_3R
(
`id` Int32,
`column1` String
)
ENGINE = MergeTree
ORDER BY id

Query id: 6041fd32-4294-44bd-b442-3fdd41333e6f

┌─host──────────────────┬─port─┬─status─┬─error─┬─num_hosts_remaining─┬─num_hosts_active─┐
│ chnode1.marsnet.local │ 9440 │ 0 │ │ 2 │ 2 │
└───────────────────────┴──────┴────────┴───────┴─────────────────────┴──────────────────┘
┌─host──────────────────┬─port─┬─status─┬─error─┬─num_hosts_remaining─┬─num_hosts_active─┐
│ chnode2.marsnet.local │ 9440 │ 0 │ │ 1 │ 1 │
└───────────────────────┴──────┴────────┴───────┴─────────────────────┴──────────────────┘
┌─host──────────────────┬─port─┬─status─┬─error─┬─num_hosts_remaining─┬─num_hosts_active─┐
│ chnode3.marsnet.local │ 9440 │ 0 │ │ 0 │ 0 │
└───────────────────────┴──────┴────────┴───────┴─────────────────────┴──────────────────┘

· 6 min read

Overview: This article walks through the process of sending data from a Kafka topic to a ClickHouse table. We’ll use the Wiki recent changes feed, which provides a stream of events that represent changes made to various Wikimedia properties. The steps include:

  1. How to setup Kafka on Ubuntu
  2. Ingest a stream of data into a Kakfa topic
  3. Create a ClickHouse table that subscribes to the topic

1. Setup Kafka on Ubuntu

  1. Create an Ubuntu ec2 instance and SSH on to it:
ssh -i ~/training.pem ubuntu@ec2.compute.amazonaws.com
  1. Install Kafka (based on the instructions here: https://www.linode.com/docs/guides/how-to-install-apache-kafka-on-ubuntu/):
sudo apt update
sudo apt install openjdk-11-jdk

mkdir /home/ubuntu/kafka
cd /home/ubuntu/kafka/

wget https://downloads.apache.org/kafka/3.7.0/kafka_2.13-3.7.0.tgz

tar -zxvf kafka_2.13-3.7.0.tgz
  1. Start ZooKeeper:
cd kafka_2.13-3.7.0
bin/zookeeper-server-start.sh config/zookeeper.properties
  1. Open a new console and launch Kafka:
ssh -i ~/training.pem ubuntu@ec2.compute.amazonaws.com
cd kafka/kafka_2.13-3.7.0/
bin/kafka-server-start.sh config/server.properties
  1. Open a third console and create a topic named wikimedia:
ssh -i ~/training.pem ubuntu@ec2.compute.amazonaws.com
cd kafka/kafka_2.13-3.7.0/

bin/kafka-topics.sh --create --topic wikimedia --bootstrap-server localhost:9092
  1. You can verify it was created successfully by:
bin/kafka-topics.sh --list --bootstrap-server localhost:9092

2. Ingest the Wikimedia Stream into Kafka

  1. We need some utilities first:
sudo apt-get install librdkafka-dev libyajl-dev
sudo apt-get install kafkacat
  1. The data is sent to Kafka using a clever curl command that grabs the latest Wikimedia events, parses out the JSON data and sends that to the Kafka topic:
curl -N https://stream.wikimedia.org/v2/stream/recentchange  | awk '/^data: /{gsub(/^data: /, ""); print}' | kafkacat -P -b localhost:9092 -t wikimedia
  1. You can "describe" the topic:
bin/kafka-topics.sh --describe --topic wikimedia --bootstrap-server localhost:9092
  1. Let's verify everything is working by consuming some events:
bin/kafka-console-consumer.sh --topic wikimedia --from-beginning --bootstrap-server localhost:9092
  1. Hit Ctrl+c to kill the previous command.

3. Ingest the Data into ClickHouse

  1. Here is what the incoming data looks like:
{
"$schema": "/mediawiki/recentchange/1.0.0",
"meta": {
"uri": "https://www.wikidata.org/wiki/Q45791749",
"request_id": "f64cfb17-04ba-4d09-8935-38ec6f0001c2",
"id": "9d7d2b5a-b79b-45ea-b72c-69c3b69ae931",
"dt": "2024-04-18T13:21:21Z",
"domain": "www.wikidata.org",
"stream": "mediawiki.recentchange",
"topic": "eqiad.mediawiki.recentchange",
"partition": 0,
"offset": 5032636513
},
"id": 2196113017,
"type": "edit",
"namespace": 0,
"title": "Q45791749",
"title_url": "https://www.wikidata.org/wiki/Q45791749",
"comment": "/* wbsetqualifier-add:1| */ [[Property:P1545]]: 20, Modify PubMed ID: 7292984 citation data from NCBI, Europe PMC and CrossRef",
"timestamp": 1713446481,
"user": "Cewbot",
"bot": true,
"notify_url": "https://www.wikidata.org/w/index.php?diff=2131981357&oldid=2131981341&rcid=2196113017",
"minor": false,
"patrolled": true,
"length": {
"old": 75618,
"new": 75896
},
"revision": {
"old": 2131981341,
"new": 2131981357
},
"server_url": "https://www.wikidata.org",
"server_name": "www.wikidata.org",
"server_script_path": "/w",
"wiki": "wikidatawiki",
"parsedcomment": "<span dir=\"auto\"><span class=\"autocomment\">Added qualifier: </span></span> <a href=\"/wiki/Property:P1545\" title=\"series ordinal | position of an item in its parent series (most frequently a 1-based index), generally to be used as a qualifier (different from &quot;rank&quot; defined as a class, and from &quot;ranking&quot; defined as a property for evaluating a quality).\"><span class=\"wb-itemlink\"><span class=\"wb-itemlink-label\" lang=\"en\" dir=\"ltr\">series ordinal</span> <span class=\"wb-itemlink-id\">(P1545)</span></span></a>: 20, Modify PubMed ID: 7292984 citation data from NCBI, Europe PMC and CrossRef"
}
  1. We will need the Kafka table engine to pull the data from the Kafka topic:
CREATE OR REPLACE TABLE wikiQueue
(
`id` UInt32,
`type` String,
`title` String,
`title_url` String,
`comment` String,
`timestamp` UInt64,
`user` String,
`bot` Bool,
`server_url` String,
`server_name` String,
`wiki` String,
`meta` Tuple(uri String, id String, stream String, topic String, domain String)
)
ENGINE = Kafka(
'ec2.compute.amazonaws.com:9092',
'wikimedia',
'consumer-group-wiki',
'JSONEachRow'
);
  1. For some reason the Kafka table engine seems to take the public ec2 URL and convert it to the private DNS name, so I had to add that to my local /etc/hosts file:
52.14.154.92  ip.us-east-2.compute.internal
  1. You can read from a Kafka table, you just have to enable a setting:
SELECT *
FROM wikiQueue
LIMIT 20
FORMAT Vertical
SETTINGS stream_like_engine_allow_direct_select = 1;

The rows should come back nicely parsed based on the columns defined in the wikiQueue table:

id:          2473996741
type: edit
title: File:Père-Lachaise - Division 6 - Cassereau 05.jpg
title_url: https://commons.wikimedia.org/wiki/File:P%C3%A8re-Lachaise_-_Division_6_-_Cassereau_05.jpg
comment: /* wbcreateclaim-create:1| */ [[d:Special:EntityPage/P921]]: [[d:Special:EntityPage/Q112327116]], [[:toollabs:quickstatements/#/batch/228454|batch #228454]]
timestamp: 1713457283
user: Ameisenigel
bot: false
server_url: https://commons.wikimedia.org
server_name: commons.wikimedia.org
wiki: commonswiki
meta: ('https://commons.wikimedia.org/wiki/File:P%C3%A8re-Lachaise_-_Division_6_-_Cassereau_05.jpg','01a832e2-24c5-4ccb-bd93-8e2c0e429418','mediawiki.recentchange','eqiad.mediawiki.recentchange','commons.wikimedia.org')
  1. We need a MergeTree table to store these incoming events:
CREATE TABLE rawEvents (
id UInt64,
type LowCardinality(String),
comment String,
timestamp DateTime64(3, 'UTC'),
title_url String,
topic LowCardinality(String),
user String
)
ENGINE = MergeTree
ORDER BY (type, timestamp);
  1. Let's define a materialized view that gets triggered when an insert occurs on the Kafka table and sends the data to our rawEvents table:
CREATE MATERIALIZED VIEW rawEvents_mv TO rawEvents
AS
SELECT
id,
type,
comment,
toDateTime(timestamp) AS timestamp,
title_url,
tupleElement(meta, 'topic') AS topic,
user
FROM wikiQueue
WHERE title_url <> '';
  1. You should start seeing data going into rawEvents almost immediately:
SELECT count()
FROM rawEvents;
  1. Let's view some of the rows:
SELECT *
FROM rawEvents
LIMIT 5
FORMAT Vertical
Row 1:
──────
id: 124842852
type: 142
comment: Pere prlpz commented on "Plantilles Enciclopèdia Catalana" (Diria que no cal fer res als articles. Es pot actualitzar els enllaços que es facin servir a les referències (tot i que l'antic encara ha...)
timestamp: 2024-04-18 16:22:29.000
title_url: https://ca.wikipedia.org/wiki/Tema:Wu36d6vfsiuu4jsi
topic: eqiad.mediawiki.recentchange
user: Pere prlpz

Row 2:
──────
id: 2473996748
type: categorize
comment: [[:File:Ruïne van een poortgebouw, RP-T-1976-29-6(R).jpg]] removed from category
timestamp: 2024-04-18 16:21:20.000
title_url: https://commons.wikimedia.org/wiki/Category:Pieter_Moninckx
topic: eqiad.mediawiki.recentchange
user: Warburg1866

Row 3:
──────
id: 311828596
type: categorize
comment: [[:Cujo (película)]] añadida a la categoría
timestamp: 2024-04-18 16:21:21.000
title_url: https://es.wikipedia.org/wiki/Categor%C3%ADa:Pel%C3%ADculas_basadas_en_obras_de_Stephen_King
topic: eqiad.mediawiki.recentchange
user: Beta15

Row 4:
──────
id: 311828597
type: categorize
comment: [[:Cujo (película)]] eliminada de la categoría
timestamp: 2024-04-18 16:21:21.000
title_url: https://es.wikipedia.org/wiki/Categor%C3%ADa:Trabajos_basados_en_obras_de_Stephen_King
topic: eqiad.mediawiki.recentchange
user: Beta15

Row 5:
──────
id: 48494536
type: categorize
comment: [[:braiteremmo]] ajoutée à la catégorie
timestamp: 2024-04-18 16:21:21.000
title_url: https://fr.wiktionary.org/wiki/Cat%C3%A9gorie:Wiktionnaire:Exemples_manquants_en_italien
topic: eqiad.mediawiki.recentchange
user: Àncilu bot
  1. Let's see what types of events are coming in:
SELECT
type,
count()
FROM rawEvents
GROUP BY type
   ┌─type───────┬─count()─┐
1. │ 142 │ 1 │
2. │ new │ 1003 │
3. │ categorize │ 12228 │
4. │ log │ 1799 │
5. │ edit │ 17142 │
└────────────┴─────────┘

Let's define a materialized view chained to our current materialized view. We will keep track of some aggregated stats per minute:

CREATE TABLE byMinute
(
`dateTime` DateTime64(3, 'UTC') NOT NULL,
`users` AggregateFunction(uniq, String),
`pages` AggregateFunction(uniq, String),
`updates` AggregateFunction(sum, UInt32)
)
ENGINE = AggregatingMergeTree
ORDER BY dateTime;

CREATE MATERIALIZED VIEW byMinute_mv TO byMinute
AS SELECT
toStartOfMinute(timestamp) AS dateTime,
uniqState(user) AS users,
uniqState(title_url) AS pages,
sumState(toUInt32(1)) AS updates
FROM rawEvents
GROUP BY dateTime;
  1. We will need -Merge functions to view the results:
SELECT
dateTime AS dateTime,
uniqMerge(users) AS users,
uniqMerge(pages) AS pages,
sumMerge(updates) AS updates
FROM byMinute
GROUP BY dateTime
ORDER BY dateTime DESC
LIMIT 10;

· One min read

In order to build and contribute to ClickHouse, you must use LLVM and Clang.

These are the commands to build the latest version of LLVM and Clang on Linux:

git clone git@github.com:llvm/llvm-project.git
mkdir llvm-build
cd llvm-build
cmake -GNinja -DCMAKE_BUILD_TYPE:STRING=Release -DLLVM_ENABLE_PROJECTS=all -DLLVM_TARGETS_TO_BUILD=all ../llvm-project/llvm
time ninja
sudo ninja install

· 3 min read

This is useful when there are tables that have similar naming conventions and similar columns but are not replicated. An example is searching the system database for entries in the query log tables.

The query_log table is not replicated, and only queries that are executed on a specific node get logged. Data may also roll to a different table For example, data may be inserted into query_log_0, query_log_1, etc. Since one node may roll at a different time than others, it is useful to try to find the data we're looking for in tables that are not exactly named the same.

In essence, we need to do something like this, but in ClickHouse syntax:

SELECT column1, column2 FROM my_db.my_table_*

For this, we can use the clusterAllReplicas() to search all the nodes and the merge() table function to be able to use a regex pattern to search the multiple tables.

The following example shows how to query all tables with the prefix query_log:

clickhouse-cloud :) SELECT 
`event_time`,
`query_id`,
`query`,
`type`
FROM
clusterAllReplicas(default,merge('system', '^query_log*'))
WHERE
query ilike '%db1.table1%' and event_time > now() - toIntervalMinute(5);

SELECT
event_time,
query_id,
query,
type
FROM clusterAllReplicas(default, merge('system', '^query_log*'))
WHERE (query ILIKE '%db1.table1%') AND (event_time > (now() - toIntervalMinute(5)))

Query id: de95c13e-5759-436e-90d9-a12c1327889e

┌──────────event_time─┬─query_id─────────────────────────────┬─query──────────────────────────────────────────────────────────────────────────────────────────────────────────────────────────────────────────────────────────────────────────────┬─type────────┐
│ 2024-02-08 00:15:20 │ d1dd0d6a-4337-4e58-bdd1-c2c827b6dfe2 │ /* ddl_entry=query-0000000428 */ CREATE TABLE db1.table1 UUID '781f25db-3cd1-47c6-a76e-701945a67485' (`id` Int32, `string_column` String) ENGINE = ReplicatedMergeTree ORDER BY id │ QueryStart │
│ 2024-02-08 00:15:20 │ d1dd0d6a-4337-4e58-bdd1-c2c827b6dfe2 │ /* ddl_entry=query-0000000428 */ CREATE TABLE db1.table1 UUID '781f25db-3cd1-47c6-a76e-701945a67485' (`id` Int32, `string_column` String) ENGINE = ReplicatedMergeTree ORDER BY id │ QueryFinish │
└─────────────────────┴──────────────────────────────────────┴────────────────────────────────────────────────────────────────────────────────────────────────────────────────────────────────────────────────────────────────────────────────────┴─────────────┘
┌──────────event_time─┬─query_id─────────────────────────────┬─query──────────────────────────────────────────────────────────────────────────────────────────────────────────────────────────────────────────────────────────────────────────────┬─type────────┐
│ 2024-02-08 00:15:20 │ f0ca43b2-544e-4b94-a21d-0f05e777fa96 │ /* ddl_entry=query-0000000428 */ CREATE TABLE db1.table1 UUID '781f25db-3cd1-47c6-a76e-701945a67485' (`id` Int32, `string_column` String) ENGINE = ReplicatedMergeTree ORDER BY id │ QueryStart │
│ 2024-02-08 00:15:20 │ f0ca43b2-544e-4b94-a21d-0f05e777fa96 │ /* ddl_entry=query-0000000428 */ CREATE TABLE db1.table1 UUID '781f25db-3cd1-47c6-a76e-701945a67485' (`id` Int32, `string_column` String) ENGINE = ReplicatedMergeTree ORDER BY id │ QueryFinish │
└─────────────────────┴──────────────────────────────────────┴────────────────────────────────────────────────────────────────────────────────────────────────────────────────────────────────────────────────────────────────────────────────────┴─────────────┘
┌──────────event_time─┬─query_id─────────────────────────────┬─query──────────────────────────────────────────────────────────────────────────────────────────────────────────────────────────────────────────────────────────────────────────────┬─type────────┐
│ 2024-02-08 00:15:20 │ 5cc0a508-7f64-460b-a5be-949ef1d1f2ca │ /* ddl_entry=query-0000000428 */ CREATE TABLE db1.table1 UUID '781f25db-3cd1-47c6-a76e-701945a67485' (`id` Int32, `string_column` String) ENGINE = ReplicatedMergeTree ORDER BY id │ QueryStart │
│ 2024-02-08 00:15:20 │ 5cc0a508-7f64-460b-a5be-949ef1d1f2ca │ /* ddl_entry=query-0000000428 */ CREATE TABLE db1.table1 UUID '781f25db-3cd1-47c6-a76e-701945a67485' (`id` Int32, `string_column` String) ENGINE = ReplicatedMergeTree ORDER BY id │ QueryFinish │
│ 2024-02-08 00:15:20 │ d1e01cb0-a27c-44b2-829c-90fb2596c9c0 │ create table db1.table1
(
id Int32,
string_column String
)
engine = MergeTree
order by id │ QueryStart │
│ 2024-02-08 00:15:20 │ d1e01cb0-a27c-44b2-829c-90fb2596c9c0 │ create table db1.table1
(
id Int32,
string_column String
)
engine = MergeTree
order by id │ QueryFinish │
│ 2024-02-08 00:15:27 │ 6c2c6c3f-173e-464f-bfa0-643089ca085e │ insert into db1.table1
values
│ QueryStart │
│ 2024-02-08 00:15:27 │ 6c2c6c3f-173e-464f-bfa0-643089ca085e │ insert into db1.table1
values
│ QueryFinish │
└─────────────────────┴──────────────────────────────────────┴────────────────────────────────────────────────────────────────────────────────────────────────────────────────────────────────────────────────────────────────────────────────────┴─────────────┘

10 rows in set. Elapsed: 0.046 sec. Processed 317.27 thousand rows, 33.57 MB (6.89 million rows/s., 729.43 MB/s.)
Peak memory usage: 67.04 MiB.

Note that the columns you select must exist on each of the tables being queried or you may encounter an error such as:

Received exception from server (version 24.0.2):
Code: 47. DB::Exception: Received from abc123.us-west-2.aws.clickhouse.cloud:9440. DB::Exception: Missing columns: 'hostname' while processing query: 'WITH 'query_log_0' AS _table

Alternatively, you can use the EXCEPT clause to exclude any columns that may not be present on different tables.

example:

SELECT * EXCEPT (used_privileges, missing_privileges)
FROM clusterAllReplicas(default, merge('system', 'query_log[\\_]*'))
WHERE (query_id = '31a93b8e-1149-4edd-a33d-f03f47a676cc') AND (event_time = '2024-10-21 12:49:04')